Your How to put background picture in word 2013 images are available. How to put background picture in word 2013 are a topic that is being searched for and liked by netizens today. You can Download the How to put background picture in word 2013 files here. Get all free photos.
If you’re looking for how to put background picture in word 2013 pictures information related to the how to put background picture in word 2013 interest, you have come to the right site. Our site frequently gives you suggestions for viewing the highest quality video and picture content, please kindly hunt and find more informative video content and graphics that fit your interests.
How To Put Background Picture In Word 2013. Now the Word option window will be opened. How to crop photos in Word 2013. Follow our Word 2013 category to constantly update your best Word tips. Next from the backstage view click the Options button.
 Word 2016 How To Set Background Technipages From technipages.com
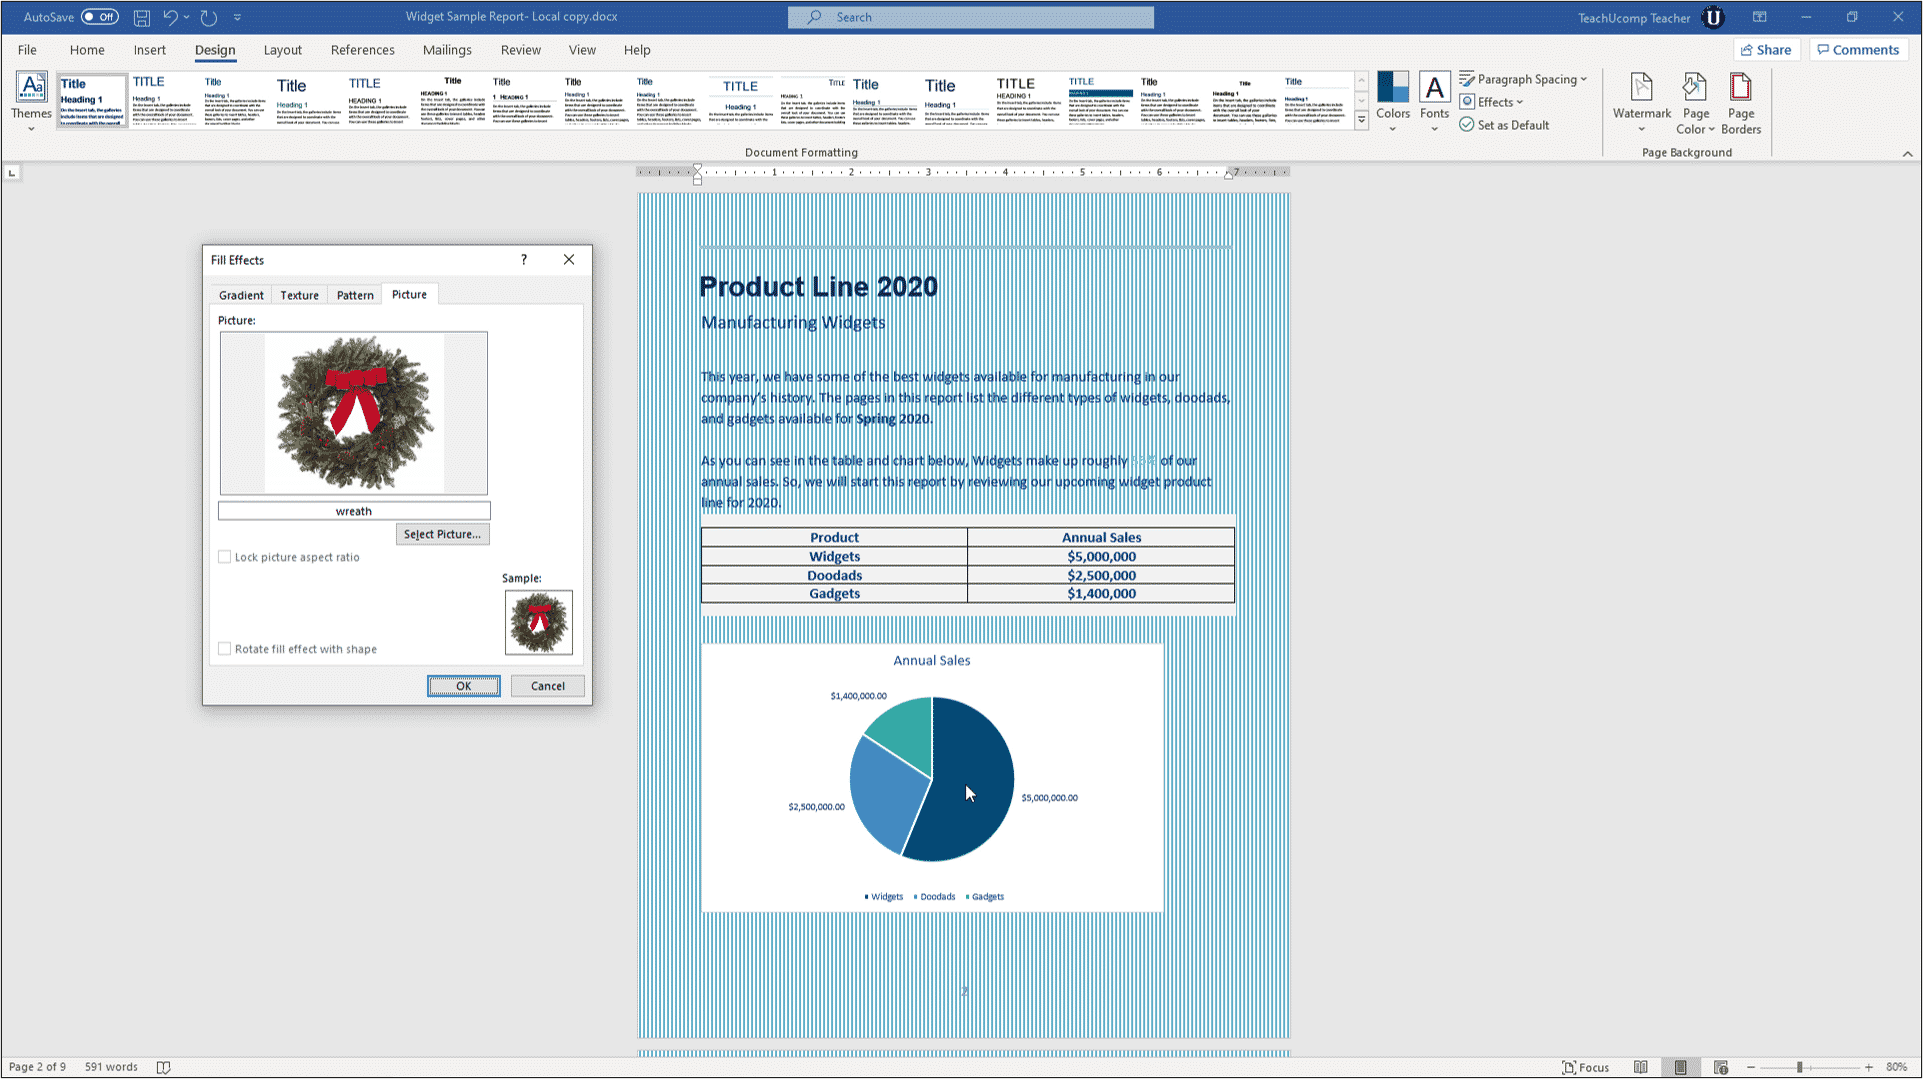
This allows the text on the page to show on top of the image. Select the image file then click Insert. A Format Picture box will open. Then select the larger image and right click then choose Wrap Text Square see screenshot. Select Picture Select Picture browse through your image files and choose the image that you want to use. Next right click on the shape first page and select Format Shape in the menu that appears.
Open the MS Word file you want to add an image background to.
How to crop photos in Word 2013. Go to the Design tab and click the Page Color drop-down in the Page Background set of tools. Add or change a background image or watermark. Click on the File tab and open the document you want to add a background image. Open the MS Word file you want to add an image background to. This allows the text on the page to show on top of the image.
 Source: pinterest.com
With the image selected go to Picture Format Arrange Wrap Text Behind text. Repeat the first step to format the second smaller image. This allows the text on the page to show on top of the image. Make sure Fill is selected then select Picture or Texture Fill. In this tutorial i will show you how to set a background image on word 2010 and 2013 which is printable and it doesnt get in the way of other content in the.
 Source: pinterest.com
A Format Picture box will open. Open the MS Word file you want to add an image background to. If you are using Microsoft Word 2010 or earlier versions after returning to the Format AutoShape dialog box please click Color No color in the Line section and click the OK button. Choose the Display tab and then check the box titled Print background colors and images and finally click on the Ok button. If you want the background image to show with full color intensity clear the Washout check box.
 Source: pinterest.com
To add a picture to your document background switch over to the Design tab. Remove a background image or watermark. Now the Word option window will be opened. Add or change a background image or watermark. How to crop photos in Word 2013.
 Source: pinterest.com
8Expand the Line section and check No line option in the Format Picture pane. Print Background Colors and Images in Word 2013 Open Word 2013 and click on the File Tab. A pop-up menu will open with colors to set as the background. Invite you to take a look at the video Format in Word 2013. Repeat the first step to format the second smaller image.
Source: technipages.com
Go to Design or Layout and select Watermark. Now the Word option window will be opened. Click and drag the corners of the image to resize it and completely fill the page. 8Expand the Line section and check No line option in the Format Picture pane. Go to Design or Layout and select Watermark.
 Source: pinterest.com
Cutting photos is useful when you have to handle an image that is too big or contains lots of content but you just. If you want the background image to show with full color intensity clear the Washout check box. Select Picture Select Picture browse through your image files and choose the image that you want to use. With the image selected go to Picture Format Arrange Wrap Text Behind text. Go to Design or Layout and select Watermark.
 Source: pinterest.com
If you are using Microsoft Word 2010 or earlier versions after returning to the Format AutoShape dialog box please click Color No color in the Line section and click the OK button. See the first screenshot below. Remove a background image or watermark. If you are using Microsoft Word 2010 or earlier versions after returning to the Format AutoShape dialog box please click Color No color in the Line section and click the OK button. To add a picture to your document background switch over to the Design tab.
 Source: pinterest.com
Go to Design or Layout and select Watermark. Please do with the following steps for dealing with this task in Word document. Open the MS Word file you want to add an image background to. Choose the Display tab and then check the box titled Print background colors and images and finally click on the Ok button. Double-click on the shortcut and open Microsoft Word.
 Source: pinterest.com
First you should insert the two pictures as you need. At the very bottom of this pop-up is an option Fill Effects. Choose the Display tab and then check the box titled Print background colors and images and finally click on the Ok button. Click and drag the corners of the image to resize it and completely fill the page. See the first screenshot below.
 Source: pinterest.com
When you crop an image part of the image will be removed. Go to Design or Layout and select Watermark. In this tutorial i will show you how to set a background image on word 2010 and 2013 which is printable and it doesnt get in the way of other content in the. Please do with the following steps for dealing with this task in Word document. This allows the text on the page to show on top of the image.
 Source: es.pinterest.com
Then select the larger image and right click then choose Wrap Text Square see screenshot. With Word open and a new document created click on the Insert tab at the top and then the click on the Shapes button and select rectangle. Print Background Colors and Images in Word 2013 Open Word 2013 and click on the File Tab. A pop-up menu will open with colors to set as the background. Make sure Fill is selected then select Picture or Texture Fill.
 Source: pinterest.com
Invite you to take a look at the video Format in Word 2013. Now youve got an image background thats on one page of the document only. Add or change a background image or watermark. Select Picture Select Picture browse through your image files and choose the image that you want to use. If we want the image to be used as a background for all the slides at the bottom of the Format Background task.
 Source: pinterest.com
Add or change a background image or watermark. New tutorial for new Microsoft Word 2013. Make sure Fill is selected then select Picture or Texture Fill. See the first screenshot below. In Options select the Display tab.
 Source: pinterest.com
With the image selected go to Picture Format Arrange Wrap Text Behind text. Can you set an image as a background in Word. Choose the Option button from the backstage view. First you should insert the two pictures as you need. Add or change a background image or watermark.
 Source: pinterest.com
Add or change a background image or watermark. To add a picture to your document background switch over to the Design tab. Choose the Option button from the backstage view. Now the Word option window will be opened. If you are using Microsoft Word 2010 or earlier versions after returning to the Format AutoShape dialog box please click Color No color in the Line section and click the OK button.
 Source: pinterest.com
First you should insert the two pictures as you need. 7Check the Tile Picture as texture option in the Format Picture pane. Go to Design or Layout and select Watermark. At the very bottom of this pop-up is an option Fill Effects. Add or change a background image or watermark.
 Source: pinterest.com
Now youve got an image background thats on one page of the document only. Double-click on the shortcut and open Microsoft Word. Make sure Fill is selected then select Picture or Texture Fill. If you are using Microsoft Word 2010 or earlier versions after returning to the Format AutoShape dialog box please click Color No color in the Line section and click the OK button. See the first screenshot below.
 Source: pinterest.com
To add a picture to your document background switch over to the Design tab. Click and drag the corners of the image to resize it and completely fill the page. With the image selected go to Picture Format Arrange Wrap Text Behind text. See the first screenshot below. How to crop photos in Word 2013.
This site is an open community for users to do sharing their favorite wallpapers on the internet, all images or pictures in this website are for personal wallpaper use only, it is stricly prohibited to use this wallpaper for commercial purposes, if you are the author and find this image is shared without your permission, please kindly raise a DMCA report to Us.
If you find this site serviceableness, please support us by sharing this posts to your own social media accounts like Facebook, Instagram and so on or you can also bookmark this blog page with the title how to put background picture in word 2013 by using Ctrl + D for devices a laptop with a Windows operating system or Command + D for laptops with an Apple operating system. If you use a smartphone, you can also use the drawer menu of the browser you are using. Whether it’s a Windows, Mac, iOS or Android operating system, you will still be able to bookmark this website.